Download Custom Resolution Utility 1.5.3 for Windows

Free download Custom Resolution Utility 1.5.3 full version standalone offline installer for Windows PC,
Custom Resolution Utility Overview
It allows you to create custom screen resolutions by directly modifying your monitor's EDID (Extended Display Identification Data). It's designed for advanced users who want more control over their display settings, particularly gamers or professionals needing specific screen setups.Features of Custom Resolution Utility
Easy Custom Resolution Creation
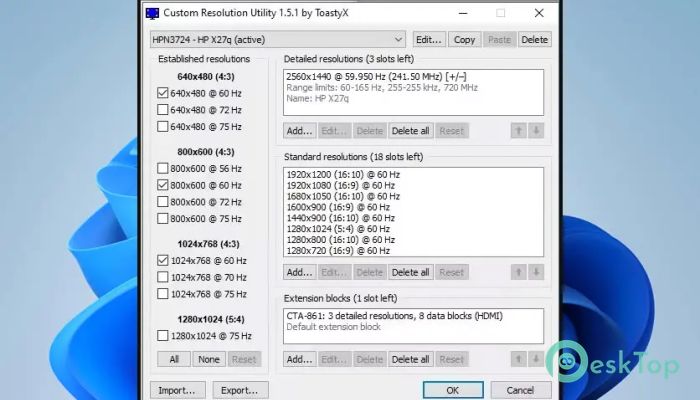
The software opens up immediately without needing installation. Once launched, you're greeted with a clean and straightforward interface. It displays all existing resolutions associated with your monitor and allows you to add new ones. You can manually create both detailed and standard resolution entries with just a few clicks.
Fine-Tuning Detailed Resolutions
You have full control over every parameter—horizontal and vertical active pixels, sync width, blanking intervals, refresh rate, and more. The tool allows up to six detailed resolutions, with the first one prioritized as the preferred display mode. Even if you're not a tech expert, there are automatic timing presets tailored for LCD and CRT monitors to make the process easier.
Standard Resolutions for Older Monitors
For those using older CRT monitors or dealing with unusual hardware, the tool also supports adding standard resolutions. These are simplified entries compared to detailed ones and are a great way to extend the usability of legacy displays.
Importing EDID Files
Besides creating resolutions from scratch, users can import EDID files in BIN, RAW, DAT, or INF format to override a monitor's capabilities. This feature is handy when working with multiple monitors or when you need to replicate configurations across different systems.
Important GPU Compatibility Notes
Keep in mind that it only supports AMD/ATI and NVIDIA GPUs—Intel graphics are excluded because they don’t allow EDID overrides. Also, laptops with switchable graphics might face limitations or incompatibility issues. So, before diving in, make sure your hardware is compatible.
How It Helps Unlock Monitor Potential
This utility becomes a lifesaver when dealing with non-standard or high-refresh-rate displays. For example, if you're using an old monitor that technically supports 75Hz but is stuck at 60Hz due to EDID limitations, this tool can help you unlock its full capabilities.
Using Built-In Reset Tools
If things go sideways or you want to undo your changes, don’t worry. The downloaded archive includes a “reset-all.exe” file that allows you to revert everything to its default settings quickly. It’s a handy safety net when you're experimenting with display settings.
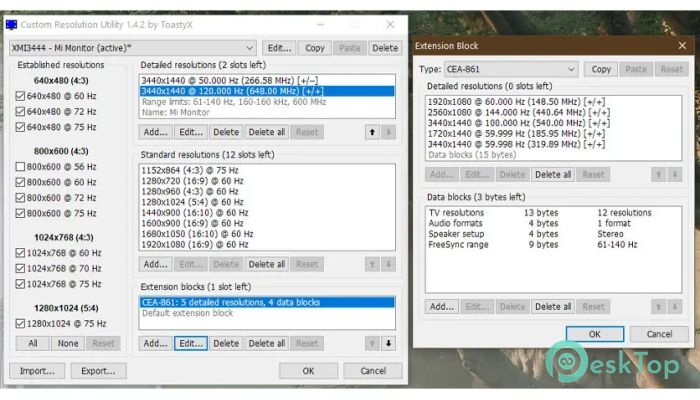
New Features in Recent Versions
The latest update has added extension support override data blocks (HF-EEODB), making it compatible with a wider range of display configurations. It also supports editing FreeSync version 3 data blocks, including extended refresh ranges. Plus, the tool now preserves display border settings when working with EDID detailed resolutions.
System Requirements and Technical Details
Operating System: Windows 11/10/8.1/8/7
Processor: Minimum 1 GHz Processor (2.4 GHz recommended)
RAM: 2GB (4GB or more recommended)
Free Hard Disk Space: 200MB or more is recommended

-
Program size438.86 KB
-
Version1.5.3
-
Program languagemultilanguage
-
Last updatedBefore 1 Year
-
Downloads43Ralated programs
![Start Everywhere]() Start Everywhere
Start Everywhere ![ChrisPC Win Experience Index]() ChrisPC Win Experience Index
ChrisPC Win Experience Index ![Winslop]() Winslop
Winslop![VokoscreenNG]() VokoscreenNG
VokoscreenNG![Silverbullet]() Silverbullet
Silverbullet![Kataloger]() Kataloger
Kataloger